HEXO typora github blog 博客搭建
介绍hexo 的基本生成部署操作和typora的文件如何更新到博客
Hexo 基本操作
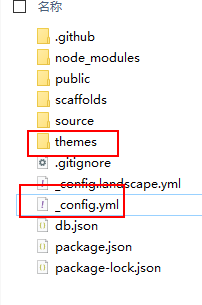
我们定义根目录是含有主题、 source等信息的根目录,如下是根目录内的文件
首先是要先把新建的仓库clone到本地,新建博客源码分支,初始化hexo,具体命令如下:
1 | $ git clone xxxxxx // xxxxx是github上复制的clone地址 |
到这里就可以打开浏览器输入localhost:4000,进行本地预览了。
站点文件配置
还需要修改Hexo的配置文件_config.yml,注意此文件应位于hexo目录下,称为站点配置文件。在themes/主题名路径下也有一个_config.yml,称之为主题配置文件。在站点配置文件同级目录下,你可以添加多个主题
添加主题
比如添加next主题:
1 | $ cd hexo //确保当前目录处于站点配置目录下 |
执行如下命令本地验证主题是否生效:
1 | $ hexo clean // 清理之前生成的资源 |
打开浏览器输入localhost:4000,进行本地预览。

部署deploy到github
首先需要安装插件hexo-deployer-git
1 | $ npm install hexo-deployer-git --save |
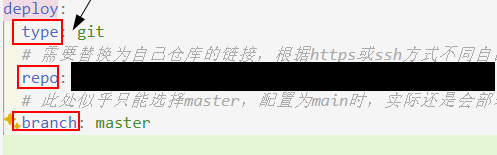
修改站点配置文件,搜索deploy
1 | # Deployment |
可以将配置修改为如上,记得替换自己的仓库链接。此外配置branch时,设置为main实测是无效的,依旧会push到master分支,如果没有master分支,则会自己创建。这也是为什么在前面推荐修改默认创建分支为master,来自强迫症患者的倔强。
多个GitHub账号配置和多个Hexo博客地址配置
如果你使用 多个GitHub账号配置和多个Hexo博客地址配置, 则需要做一些操作
删除全局配置
1 | git config --global --unset 'user.name' |
设置local配置
在自己的每个文件夹(repo仓库)下,打开Git Bash,然后进行设置。
1 | git config user.name `xxx` |
部署到Github
修改配置后,需要手动部署到Github
1 | hexo g -d |
部署成功后,稍待片刻,便可访问GitHub上自己的博客查看效果了。
问题
问题1:
You have to configure the deployment settings in _config.yml first!
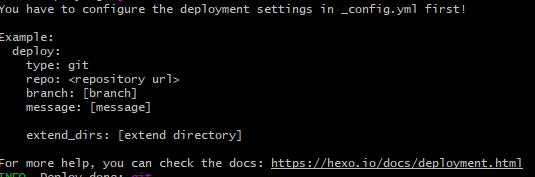
原因:yml格式不对 冒号后面唯一空格,是repo 不是github
问题2
fatal: unable to auto-detect email address
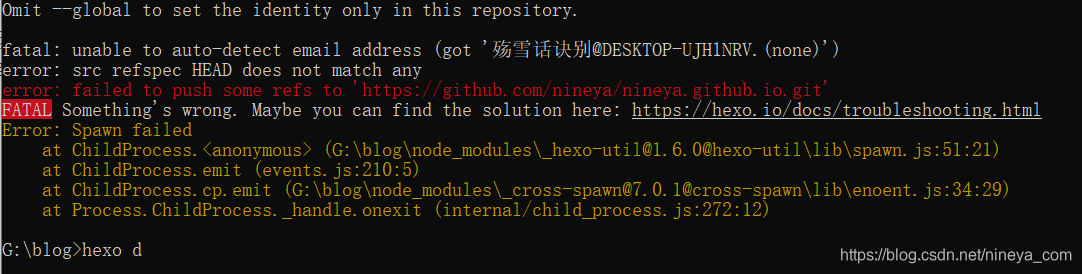
2.进入我们博客目录的“.deploy_git.git”子目录,找到config文件。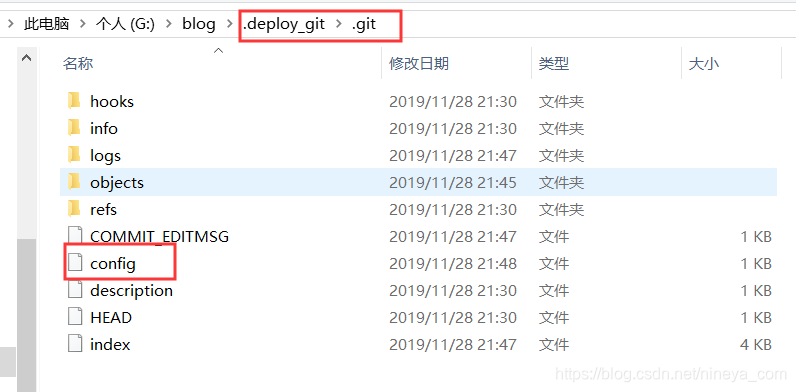
3.打开config文件,添加以下内容
1 | [user] |
再次运行
1 | hexo g -d |
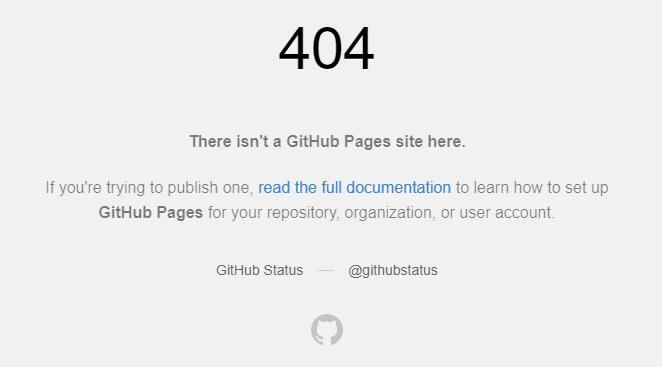
问题3:blog 404
github创建个人网页登录后404无法显示的问题
https://blog.csdn.net/weixin_43658047/article/details/133742886
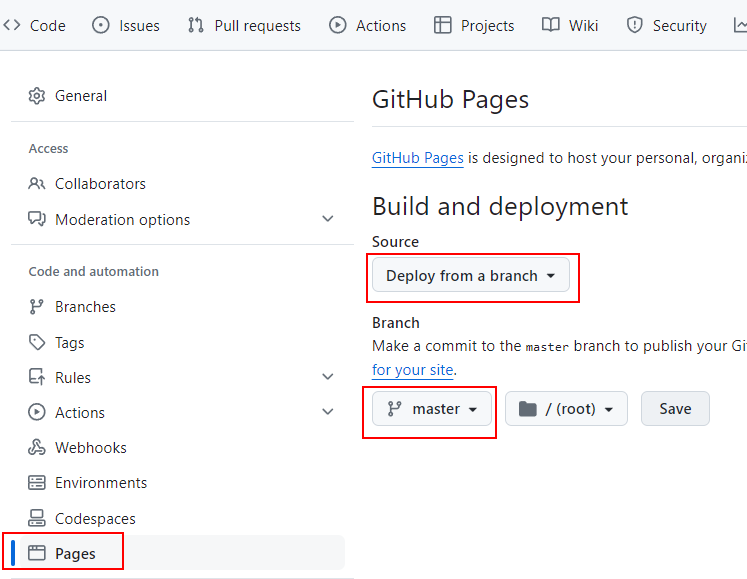
1.首先必须要有内容,默认是会找index.html文件,找不到该文件会找readme.md文件,也就是说最简单的方法是,创建了与用户名同名的repository后username.github.io后,添加一个readme.md文件,得在readme里打点字,这个里面得有东西
2.另外在username.github.io这个repository的setting/github page中这个选择Deploy from a branch,注意将仓库里里的main分支改为master,同时在下图页面,将底下默认的main改成master,就能访问了
typora更新至blog
generate md 和image存放结构
在 讨论图片如何设置前,我们需要先知道 hexo g 的时候图片和md文件会如何放置
在_config.yml文件里有一个参数 post_asset_folder , 它有两个作用:
如果为true, 会在使用 hexe new blogname 时候,在创建 md文件同时 ,还创建一个同名文件夹
1
2
3_posts
[blogname.md]
[blogname]同时还需要安装一个插件
hexo-asset-image1
npm install https://github.com/CodeFalling/hexo-asset-image --save
即post_asset_folder 激活 和 hexo-asset-image 插件安装好情况下,在generate的时候,
除了 在imgs在存放 img ,还在 blog里存放img

如果为false,只在source/imgs在存放 img

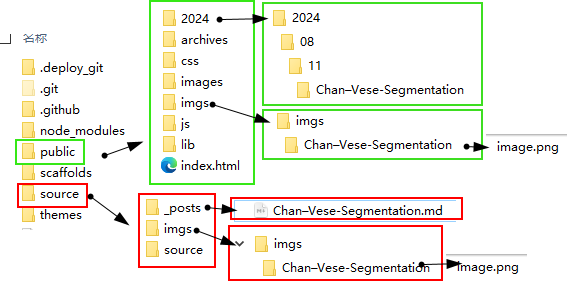
总结路径关系:
source/posts里 的 md →public/yy/mm/dd/blogname/index.htmlsource/imgs/blogname里 的 image →public/imgs/blogname/imagesource/posts/blogname里 的 image →public/yy/mm/dd/blogname/images(只在post_asset_folder 为true + 安装hexo-asset-image时 产生 )
typora图片路径
根据是否激活post_asset_folder,其路径配置也不太一样, 目前 只有激活的的没有问题,没有激活的html的图片显示还是有些问题没有解决
post_asset_folder 为 true
我们先观察blog取的图片路径,以next主题为例(其他主题可能有差异,不能确定是否适用),需要显示图片的主要有两个地方:1. home 预览页即主页 2. 完整博客内容页
切换 post_asset_folder 后,注意要使用hexo clean 一下
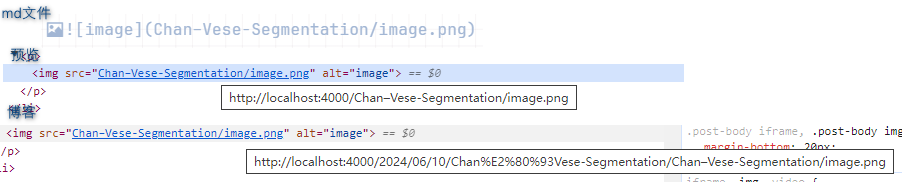
post_asset_folder 为 true+ 安装hexo-asset-image,预览和博客的图片根路径都是 public/yy/mm/dd:
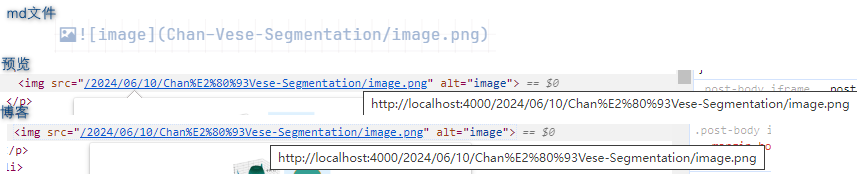
post_asset_folder 为 false+ 安装hexo-asset-image,预览的路径public 博客路径public/yy/mm/dd/blogname ,使用的路径是不同的,因而需要存放多次,可能存在预览和博客内容不一致的情况:
那么在上传新的博客的时候,只要在_posts 存放 md 文件和同名文件即可,md 按照blogname/image的形式获取即可
1 | _posts |
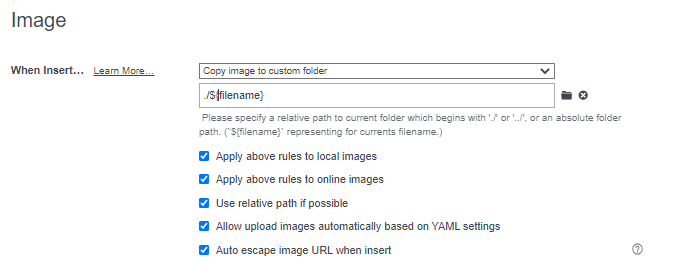
typora 图片拷贝文件位置就可以这样设置./$(filename)
post_asset_folder 为 false
没整明白。。。。。。
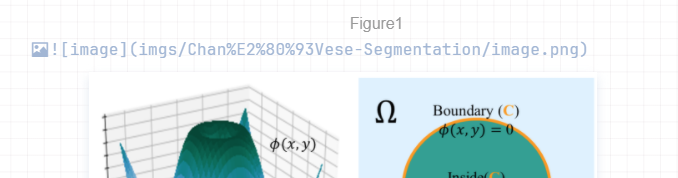
对于hexo 图片的路径和博客是分开的,图片从根目录开始为 imgs/标题名/xxxpng ,比如下面这个是一个能够正常获取的图片路径 imgs\blogname\xxx.png

因此typora的图片插入路径需要与之保持统一,即路径名一致 imgs\blogname\xxx.png
我们只要确保md能够通过这一路径访问并显示图片,那么我们就能实现typora和网页端都能正常显示图片了,typora 显示这种路径规则的图片有多种方式:
最简单的,把图像存在imgs\filename 中
- 在preference中设置图片的copy路径 ,
imgs/$filename - 在md 文件中 用
imgs\blogname\xxx.png获取图片
- 在preference中设置图片的copy路径 ,
多种组合实现:举个例子:
在preference中设置图片的copy路径 ,比如
../imgs/$filename在format - image - use image root path 设置
..上一级目录为图片根目录

在md 文件中 用
imgs\blogname\xxx.png获取图片1+2部其实就消除了
..
md文件 head
1 | --- |
将<!-- more -->插入到文章后,主页在插入处截止了预览,出现的阅读全文的按钮。
问题: 路径错误/.com//
hexo图片显示不出且图片路径错误/.com//
https://blog.csdn.net/sluck_0430/article/details/136431303
卸载 hexo-asset-image 插件:npm uninstall hexo-asset-image 即可
!! 卸载
hexo-renderer-pandoc, 他会影响 mathjax 渲染
公式渲染
- 首先,在NexT主题配置文件中将
mathjax设为渲染引擎
1 | math: |
mathjax 和 katex 是互斥的两个选项,enable 不能同时 true或 false。
如果设置 mathjax : true ,就需要更换渲染引擎, hexo-renderer-pandoc 或 hexo-renderer-kramed。
如果 katex : true ,则需要更换 hexo-renderer-markdown-it ,或者在原来的 hexo-renderer-marked 引擎下使用 markdown-it-katex plugin。
- 安装插件
1 | npm uninstall hexo-renderer-marked --savenpm |
md head添加mathjax
1
2
3title: xxx
......
mathjax: true重新生成和启动本地服务器
hexo clean && hexo s
就可以显示公式了,像这样
主题
==TODO==
REFERENCE
REF:
Github Pages + Hexo框架 + NexT主题搭建个人博客:https://blog.csdn.net/Darlinnn/article/details/130279000
Git 多个GitHub账号配置和多个Hexo博客地址配置:https://blog.csdn.net/Tmraz/article/details/107400453#5__55
GitHub Pages + Hexo搭建个人博客网站,史上最全教程:https://blog.csdn.net/yaorongke/article/details/119089190
【Hexo】GitHub+Typora写博客+图片上传:https://blog.csdn.net/Qxiaofei_/article/details/124629908